Generative Animation mit geometrischen Formen
Zufällige generative Animation von geometrischen Formen
Ziel des Tutorials
In folgendem Tutorial ist das Ziel, sich mit der Wirkungsweise von geometrischen Formen zu befassen und neue Kompositionen zu erschaffen.
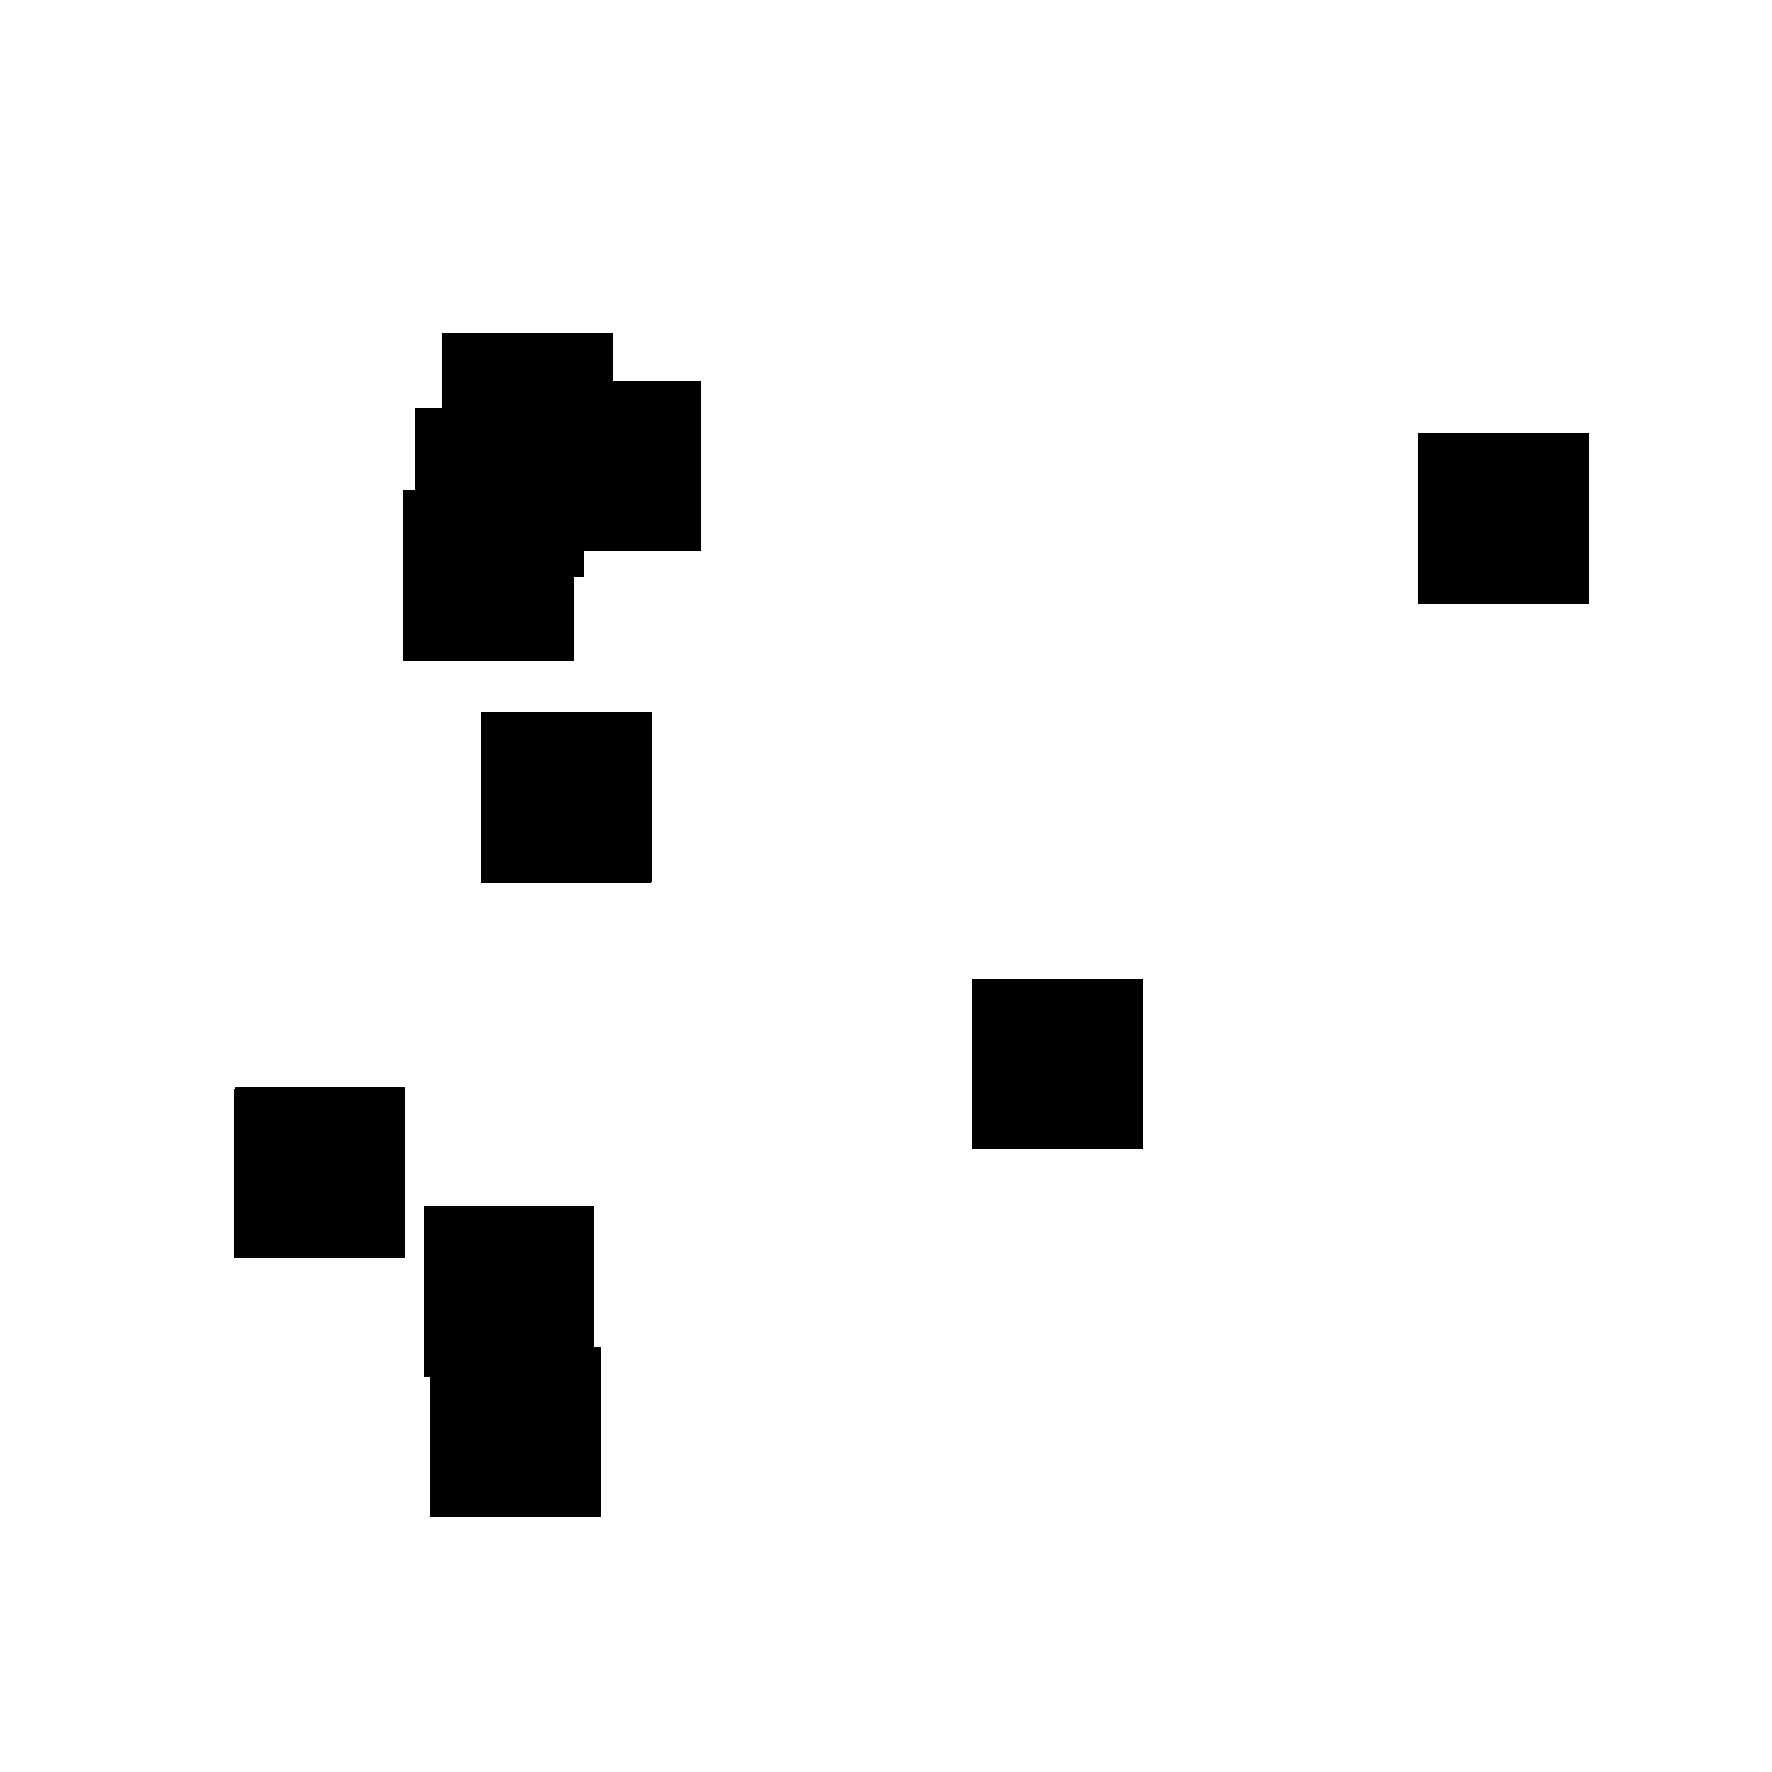
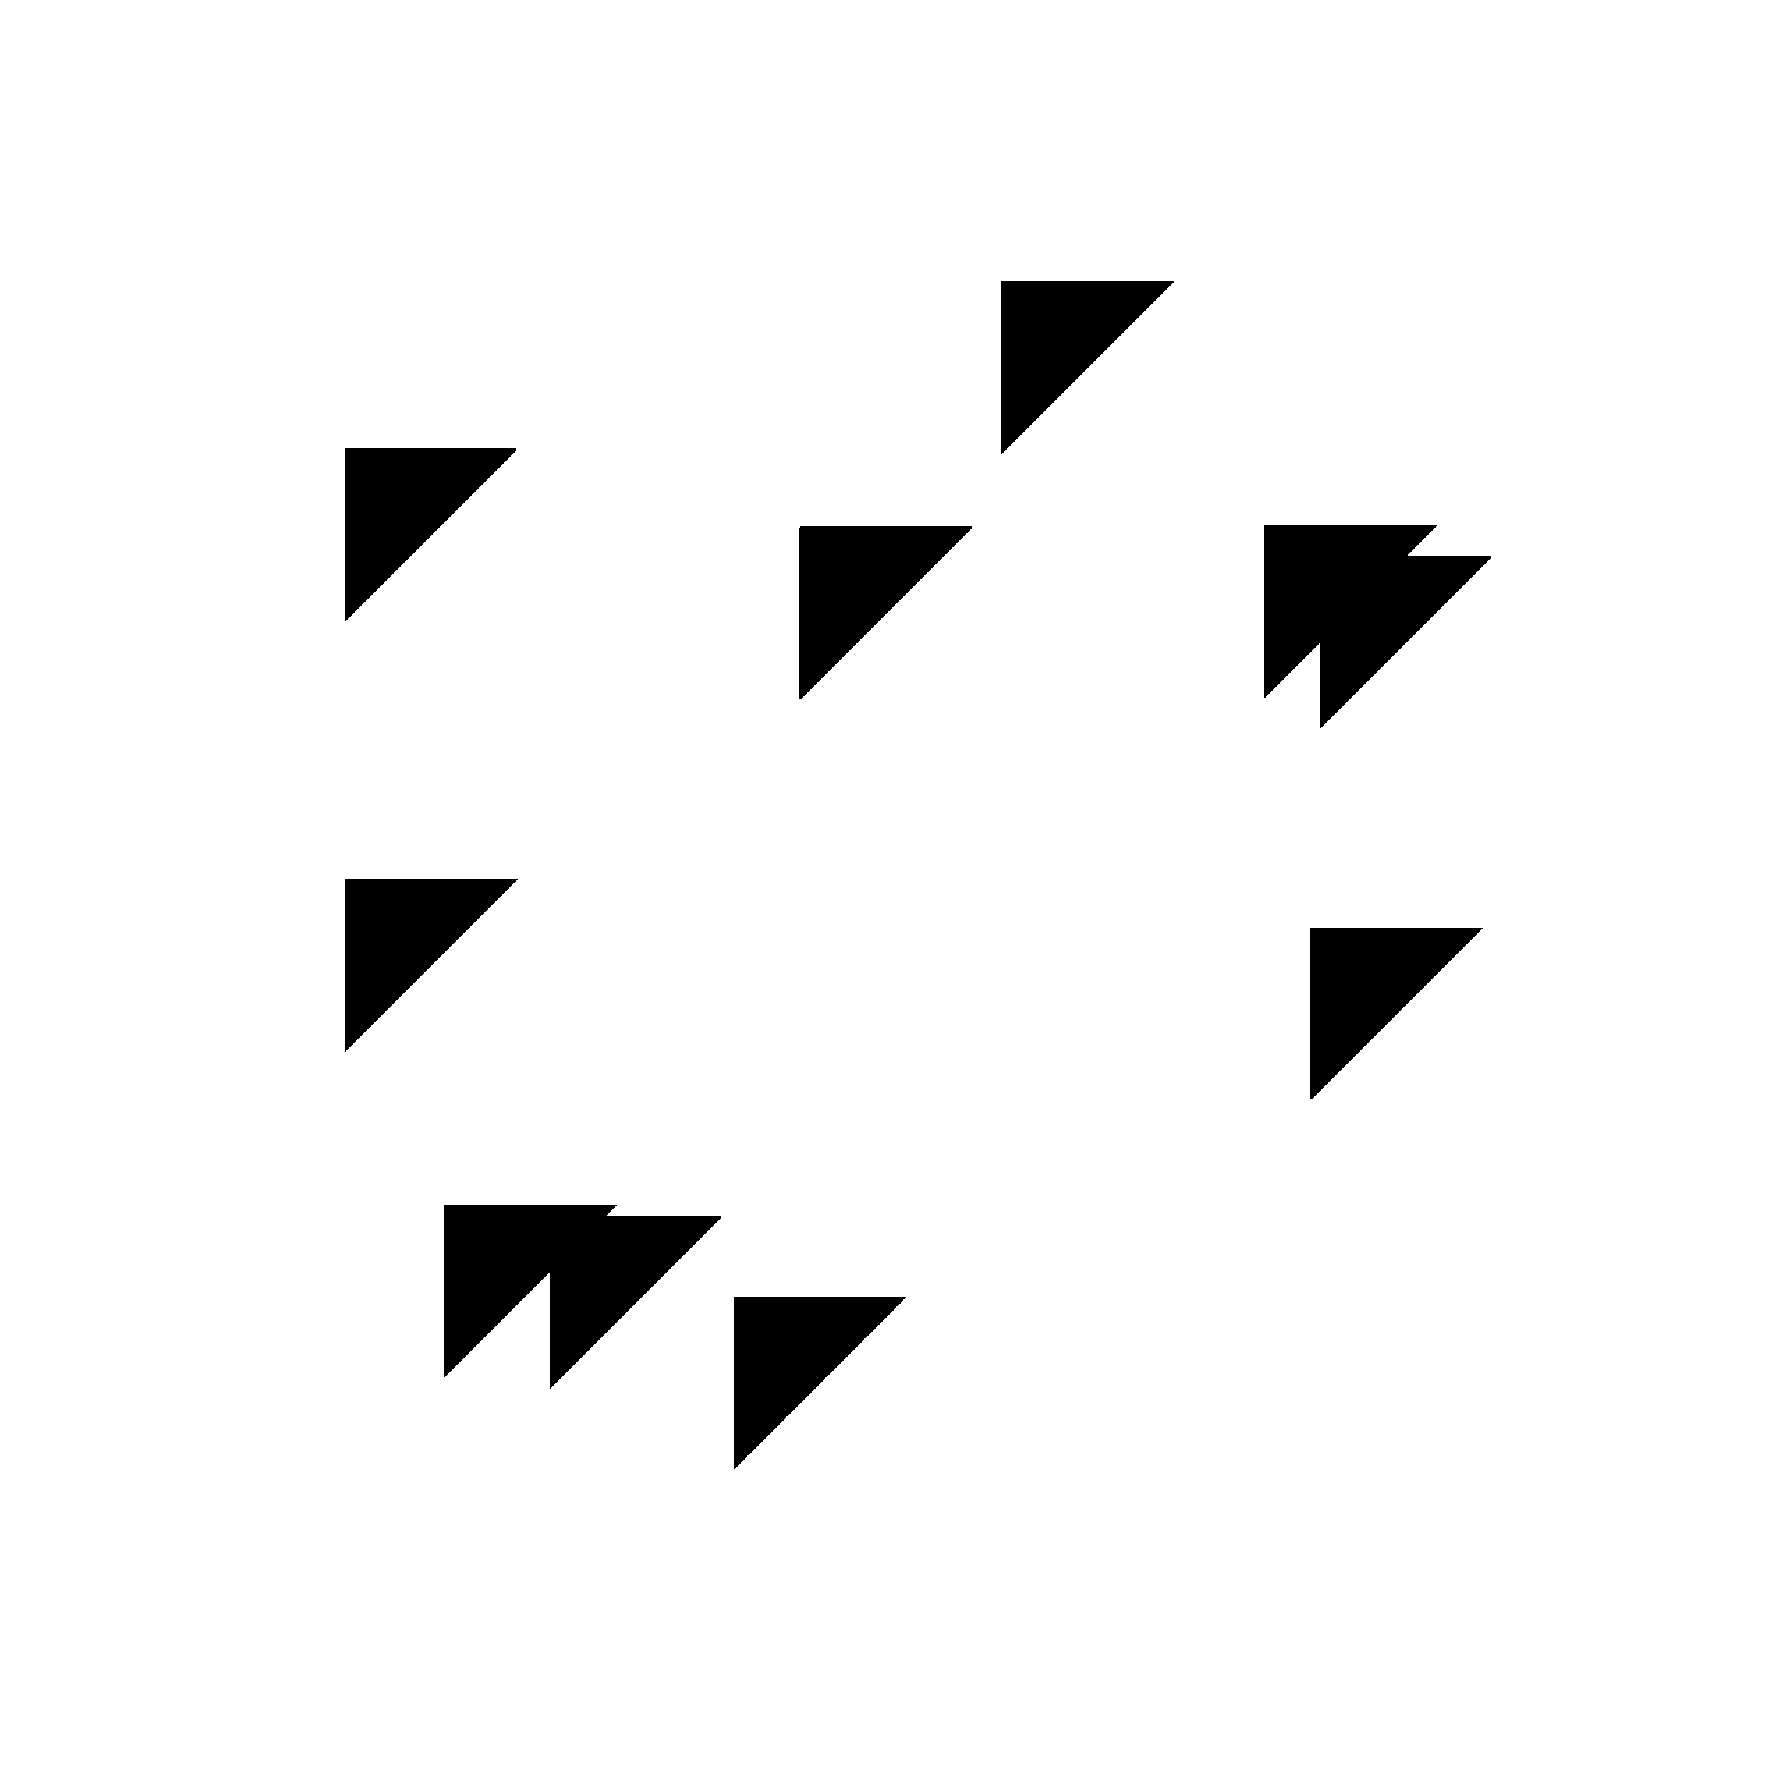
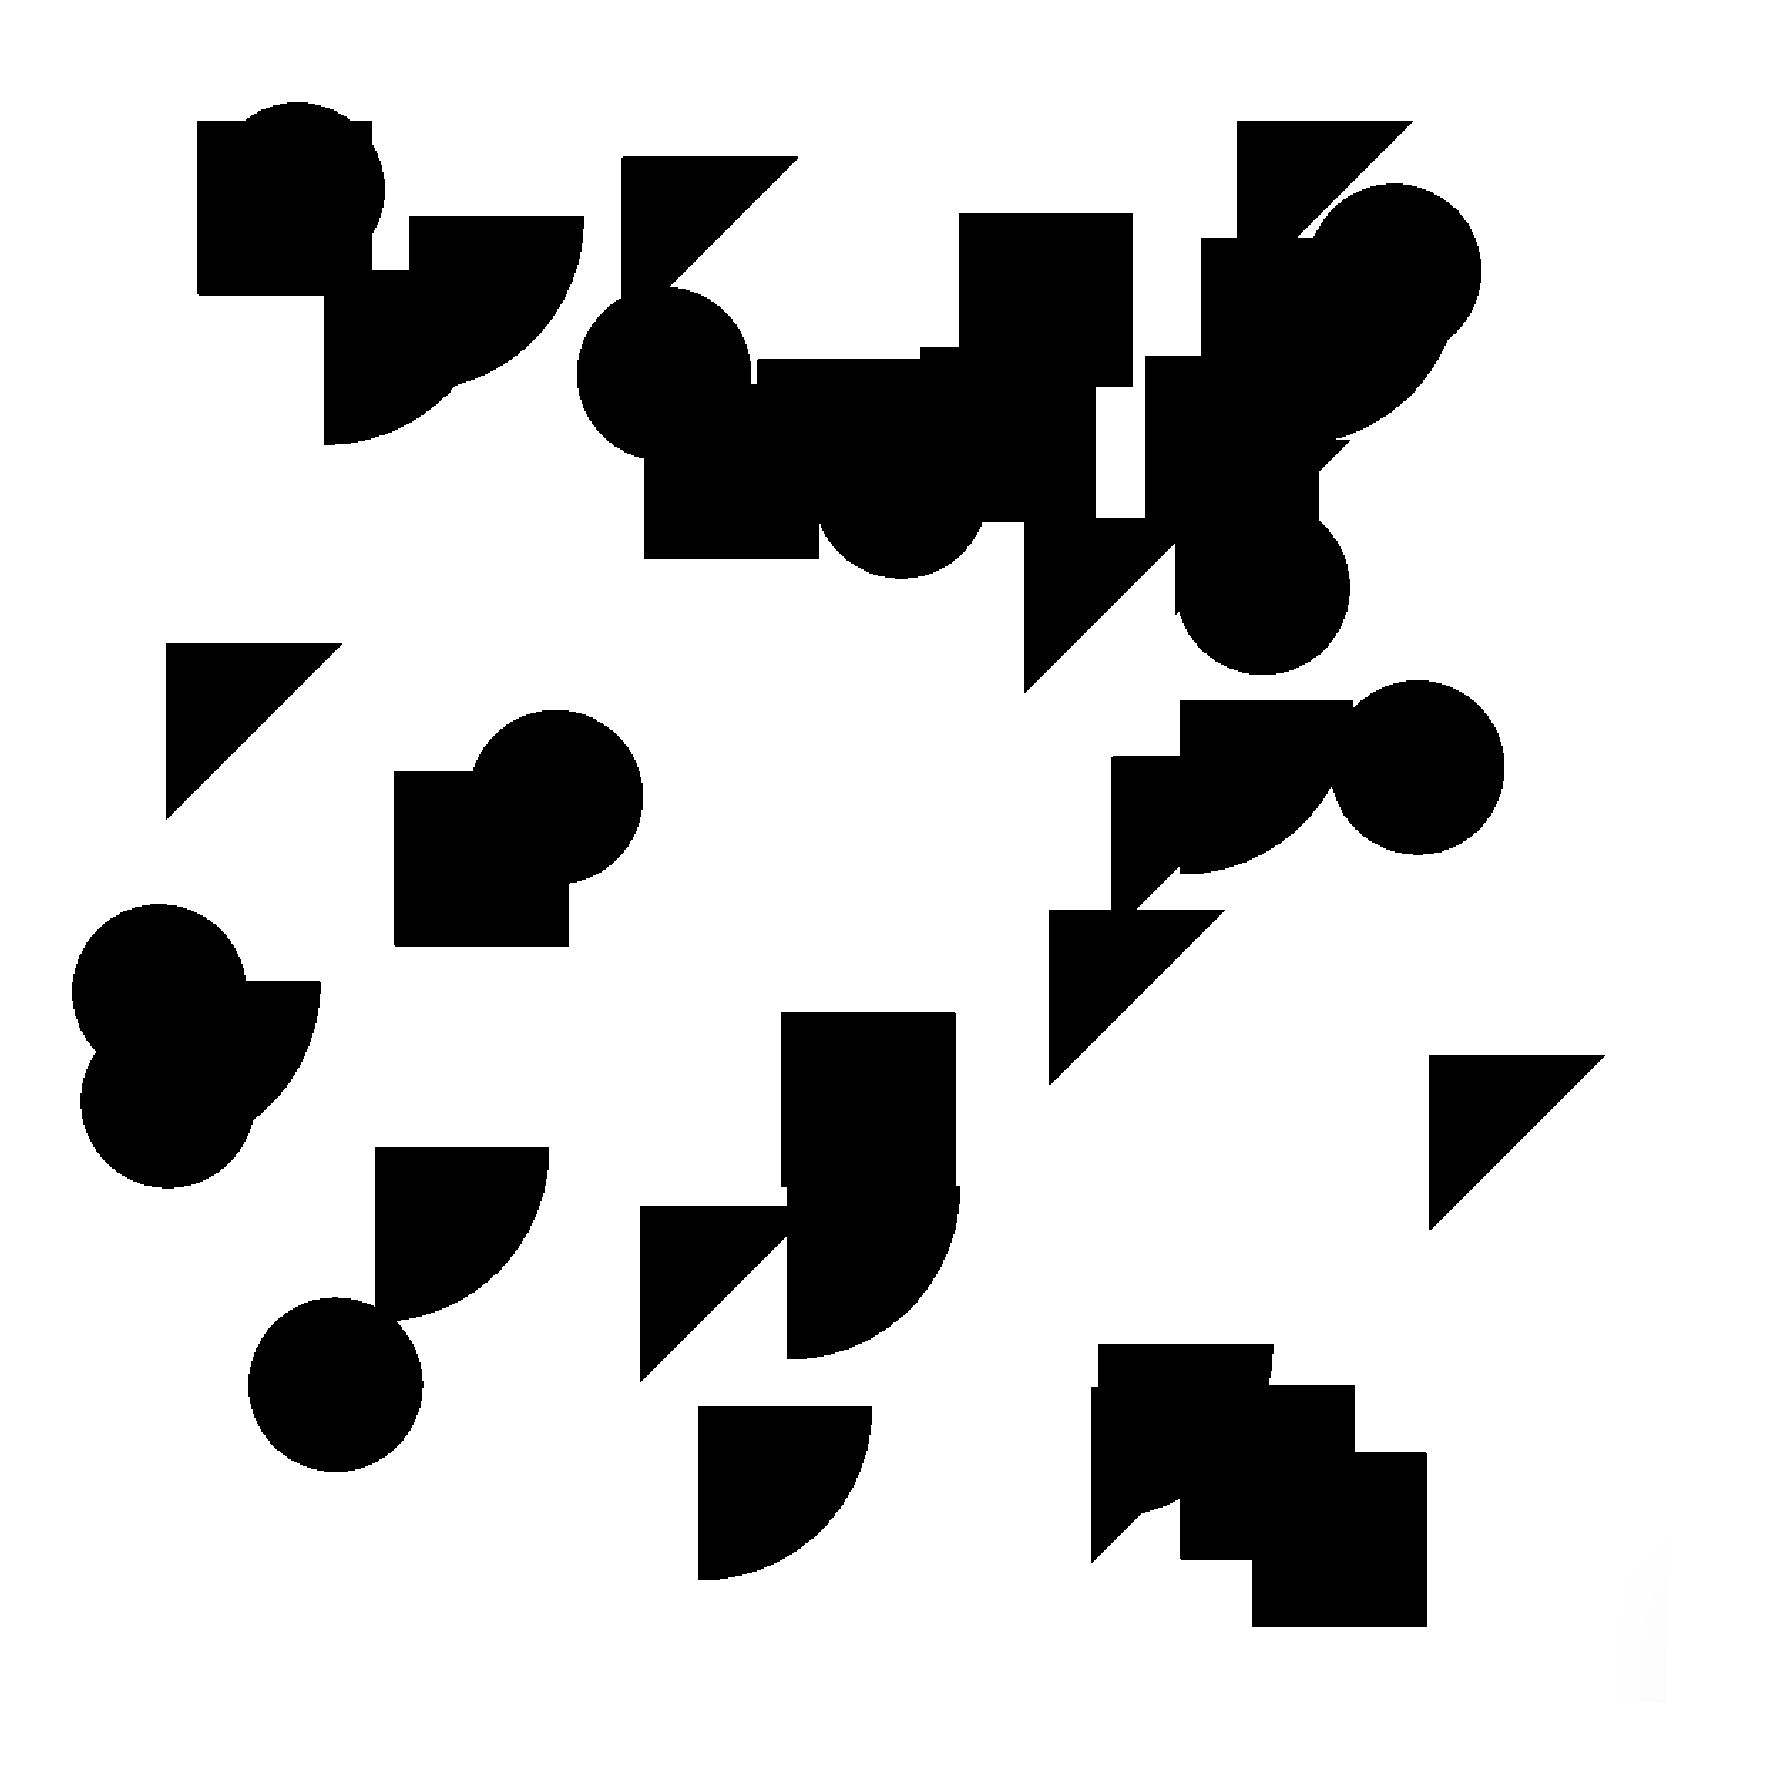
Das Fundament bilden vorerst geometrische Flächen in schwarzer Farbe, die durch ihre Zustände wie der Position und der Anzahl variiert werden können. Durch die Animation der Position entwickeln sich neue kompositorische Zusammensetzungen.
Die Gestaltungsprinzipien Gesetz der Nähe, Ähnlichkeit, Prägnanz und Kontinuität tragen maßgeblich zur Wirkung der Komposition bei. Durch das Gesetz der Nähe werden geometrische Formen, die nahe beieinander liegen als Einheit wahrgenommen und die einheitliche Wahrnehmung wird mithilfe des Gesetzes der Ähnlichkeit (Farbe schwarz) verstärkt. Das Gesetz der Prägnanz sorgt für die deutliche Abgrenzung vom schwarzen Vordergrund zum weißen Hintergrund. Ergeben sich durch die Linienführung der geometrischen Formen zueinander neue Formen, so sprechen wir hierbei vom Gesetz der Kontinuität.

p5js-Bibliothek
In diesem Tutorial nutzen wir die Bibliothek von p5js. Die Bibliothek ermöglicht Creative Coding auf effiziente Art und Weise umzusetzen und bietet durch geeignete Methoden zum Zeichnen von unterschiedlichen geometrischen Formen eine ideale Grundlage. Das Programmieren kann sowohl im Online Editor als auch in einer beliebigen Programmierumgebung geschehen, wie beispielsweise Visual Studio Code.
Globale Canvas-Variablen
canvasLength: Variable Canvasgröße in PixelgridSize: Anzahl der Segmente in x- und y-RichtungcellSize: Segmentgröße einzelnmaxPosition: Maximale Position einer Form innerhalb des Canvas
// Canvas size in pixels
let canvasLength = 800;

// Number of grid cells
let gridSize = 10;

// Size of each grid cell
let cellSize = canvasLength / gridSize;

// The maximum position of a shape, either x or y
let maxPosition = canvasLength - cellSize * 1.5;
Canvas erstellen
Nachdem wir die Canvas Variablen deklariert und initialisiert haben folgt die setup()-Funktion. Mit der Funktion createCanvas(canvasLength, canvasLength) initialisieren wir den Canvas mit der globalen Variable canvasLength, die in unserem Beispiel 800 px beträgt, und setzen die Hintergrundfarbe mit background(255) auf weiß. Zusätzlich setzen wir die Farbe aller zukünftig gezeichneten Formen mit fill(0) auf schwarz.
function setup() {
  // Create a canvas with specified dimensions
  createCanvas(canvasLength, canvasLength);

  // Set background color to white
  background(255);

  // Set fill color for shapes to black
  fill(0);
}
Globale Form-Variablen
circles: Objekt von Kreisensquares: Objekt von Rechteckenarcs: Objekt von Viertelkreisentriangles: Objekt von Dreiecken
// Declare arrays for different types of shapes
let circles; // Object to store circles
let squares; // Object to store squares
let arcs; // Object to store arcs
let triangles; // Object to store triangles
Um verschiedene Formen zu zeichnen benötigen wir vorerst eine Deklaration von globalen Arrays, die die Anzahl der unterschiedlichen Formen und deren Koordinaten zukünftig speichert. Um zu verstehen, wie die einzelnen Formen initialisiert werden müssen wir die einzelnen Klassen (Shapes, Circles, Squares, Arcs, Triangles) näher betrachten.
Oberklasse: Shapes
class Shapes {
  constructor(numOfShapes) {
    this.instances = [];
    for (let i = 0; i < numOfShapes; i++) {
      let initialPosition = {
        x: random(cellSize / 2, maxPosition),
        y: random(cellSize / 2, maxPosition),
      };

      this.instances.push({
        x: initialPosition.x, // x-coordinate of the shape
        y: initialPosition.y, // y-coordinate of the shape
      });
    }
  }
}
Die Oberklasse Shapes dient als Grundgerüst der Klassen Circles, Squares, Arcs und Triangles. Sie speichert die angegebene Anzahl an Formen numOfShapes in einen Array this.instances = []. Über die Methode push() wird ein Objekt-Literal mit den Schlüsselbezeichnungen x und y und den dazugehörigen Koordinaten-Werten an das Ende des Arrays gespeichert. Die Methode random(cellSize / 2, maxPosition) gibt dabei einen Wert zurück, der sich innerhalb des Canvas zwischen cellSize / 2 und maxPosition befindet.
Shapes: draw()-Methode
class Shapes {
  //constructor code

  draw() {
    for (let shape of this.instances) {
      this.drawShape(shape.x, shape.y);
    }
  }

  drawShape(x, y) {
    // Abstract method for drawing an instance of the shape
    // This method should be overridden by subclasses
    // Example: draw each instance using instance.x and instance.y
  }
}
Zusätzlich zum Konstruktor müssen die einzelnen Formen, die in Arrays gespeichert sind, gezeichnet werden. Die draw()-Methode iteriert durch die einzelnen Instanzen des Arrays und ruft für die einzelnen Formen die abstrakte Methode drawShape(x, y) mit den übergebenden Argumenten der x und y-Koordinate auf.
Unterklasse: Circles
class Circles extends Shapes {
  drawShape(x, y) {
    // Example: draw circle at instance.x and instance.y
    ellipse(x, y, cellSize, cellSize);
  }
}
Beschäftigen wir uns jetzt mit den Unterklassen, so haben wir beispielsweise die Unterklasse Circles, die von der Oberklasse Shapes erbt. Durch die Vererbung muss die abstrakte drawShape(x, y)-Methode von der Unterklasse Circles überschrieben werden.
Circle: Parameter der Methode ellipse(x, y, w, h)
x: x-coordinate of the center of the ellipse.
y: y-coordinate of the center of the ellipse.
w: width of the ellipse.
h: height of the ellipse (Optional)
Die drawShape(x, y) bei den Unterklassen Squares, Triangles und Arcs erfolgt wie bei Circles, nur mit dem Unterschied, dass sich die Funktion wie folgt ändert:
Square: Parameter der Methode rect(x, y, w, [Options])
x: x-coordinate of the rectangle.
y: y-coordinate of the rectangle.
w: width of the rectangle.
...
Triangle: Parameters der Methode triangle(x1, y1, x2, y2, x3, y3)
x1: x-coordinate of the first point.
y1: y-coordinate of the first point.
x2: x-coordinate of the second point.
y2: y-coordinate of the second point.
x3: x-coordinate of the third point.
y3: y-coordinate of the third point.
Arc: Parameters der Methode arc(x, y, w, h, start, stop, [mode], [detail], [Options])
x: x-coordinate of the arc's ellipse.
y: y-coordinate of the arc's ellipse.
w: width of the arc's ellipse by default.
h: height of the arc's ellipse by default.
start: angle to start the arc, specified in radians.
stop: angle to stop the arc, specified in radians.
...
class Triangles extends Shapes {
  drawShape(x, y) {
    // Example: draw circle at instance.x and instance.y
    triangle(x, y, x + cellSize, y, x, y + cellSize);
  }
}

class Squares extends Shapes {
  drawShape(x, y) {
    rect(x, y, cellSize);
  }
}

class Arcs extends Shapes {
  drawShape(x, y) {
    arc(x, y, cellSize * 2, cellSize * 2, 0, HALF_PI, PIE);
  }
}
Initialisierung der Klassen
Nachdem die Klassen erstellt wurden, können die globalen Form Variablen Circles, Squares, Triangles und Arcs initialisiert werden. Dies erfolgt durch die Methode initializeShapes(numOfCircles, numOfSquares, numOfTriangles, numOfArcs), die die deklarierten Variablen initialisiert. In der setup()-Methode wird die Funktion aufgerufen.
// Function to initialize shapes with specified numbers
function initializeShapes(
  numberOfCircles,
  numberOfSquares,
  numberOfArcs,
  numberOfTriangles
) {
  // Create instances of each shape type with given numbers
  circles = new Circles(numberOfCircles);
  squares = new Squares(numberOfSquares);
  arcs = new Arcs(numberOfArcs);
  triangles = new Triangles(numberOfTriangles);
}


// Function to draw multiple shapes
function drawShapes(...shapesList) {
  // Iterate over each shape and call its draw method
  for (let shapes of shapesList) {
    shapes.draw();
  }
}
Nach der Initialisierung können die geometrischen Formen über die Funktion drawShapes(... shapes) auf dem Canvas gezeichnet werden. Diese Methode kann beliebig viele Objekte der Klasse Shapes entgegen nehmen und zeichnet diese wie folgt:


Oberklasse Shapes: Animation der Position
Für die Animation der Position definieren wir folgende zusätzliche Variablen als Objekt-Literale im Konstruktor der Oberklasse Shapes:
startPosition: x- und y-Koordinate der StartpositionfinalDestination: x- und y-Koordinate der gesetzten EndpositiondestinationSet: Boolean, ob Destination gesetzt ist oder nichtstartTime: Millisekunden nach Aufruf der Funktion setup()
class Shapes {
  constructor(numOfShapes) {
    this.instances = [];
    for (let i = 0; i < numOfShapes; i++) {
      let initialPosition = {
        x: random(cellSize / 2, maxPosition),
        y: random(cellSize / 2, maxPosition),
      };

      let finalDestination = {
        x: random(cellSize / 2, maxPosition),
        y: random(cellSize / 2, maxPosition),
      };

      this.instances.push({
        x: initialPosition.x, // x-coordinate of the shape
        y: initialPosition.y, // y-coordinate of the shape
        startPosition: initialPosition, // Start position initially set to current position
        finalDestination: finalDestination,
        destinationSet: true,
        startTime: millis(),
      });
    }
  }

  //.. methods draw() and drawShape(x, y)

  animate() {
    for (let shape of this.instances) {
      this.animatePosition(shape);
      this.drawShape(shape.x, shape.y);
    }
  }

  animatePosition(shape) {
    //.. Function code follows
  }
}
Um die einzelnen geometrischen Formen zu animieren, definieren wir zwei Methoden in der Oberklasse Shapes. Die Methode animate() iteriert durch die intern gespeicherten Formen der Klasse und ruft die Methoden animatePosition(shape) auf, um die Position der aktuellen shape zu berechnen. Im Anschluss wird diese shape gezeichnet.
Globale Animations-Variablen
animationDuration: Speichert die Animationsdauer in MillisekundenpauseDuration: Speichert die Pausierungsdauer in MillisekundenlastActionTime: Vergangene Zeit nach der letzten ausgeführten AktionisAnimating: Boolean, der angibt ob die Animation läuft oder nicht
// Animation parameters
let animationDuration = 5000; // Animation duration in milliseconds
let pauseDuration = 5000; // Pause duration in milliseconds
let lastActionTime = 0; // Tracks the time of the last action
let isAnimating = true; // Flag to control animation
Oberklasse Shapes: animatePosition(shape)
animatePosition(shape) {
    if (!shape.destinationSet) {
      // If destination is not set, set it and mark as set
      shape.finalDestination = {
        x: random(cellSize / 2, maxPosition),
        y: random(cellSize / 2, maxPosition),
      };
      shape.destinationSet = true;
      shape.startPosition = { x: shape.x, y: shape.y }; // Store the current position as the start position
      shape.startTime = millis();
    }

    //.. further code follows
}
Über eine if-Abfrage überprüfen wir, ob die Variable destinationSet der aktuellen shape nicht gesetzt ist und setzen die Variablen finalDestination, destinationSet, startPosition und startTime. Im Anschluss werden die einzelnen geometrischen Formen im Verhältnis zur globalen Variable animationDuration erst in x- und dann in y-Richtung animiert.
Es werden innerhalb der Funktion die lokalen Variablen:
elapsedTime: Bisher vergangene Zeit in Millisekunden seit Animationsstartprogress: Fortschritt basierend auf dem Verhältnis der vergangenen Zeit zur Gesamtzeit
Es gibt drei Zustände, wie die Animation agiert:
progress <= 0.5: Animation in x-Richtung die ersten 50% der Zeitprogress > 0.5: Animation in y-Richtung die zweiten 50% der Zeitprogress >= 1: Zielkoordinaten erreicht, neue Zielkoordinaten setzen
animatePosition(shape) {
    //.. code destinationSet

    // Calculate elapsed time since animation started
    let elapsedTime = millis() - shape.startTime;

    // Calculate progress ratio (0 to 1) based on elapsed time and animation duration
    let progress = min(1, elapsedTime / animationDuration);

    if (progress <= 0.5) {
      // First half of the animation duration, move only in x direction
      // Interpolate position along x-axis from the start position to the final destination's x-coordinate
      shape.x = lerp(
        shape.startPosition.x,
        shape.finalDestination.x,
        progress * 2
      );
      shape.y = shape.startPosition.y; // Keep y-coordinate constant
    } else {
      // Second half of the animation duration, move only in y direction
      // Interpolate position along y-axis from the start position to the final destination's y-coordinate
      shape.y = lerp(
        shape.startPosition.y,
        shape.finalDestination.y,
        (progress - 0.5) * 2
      );
      shape.x = shape.finalDestination.x; // Keep x-coordinate constant
    }

    // Check if reached final destination
    if (progress >= 1) {
      // Set new destination
      shape.finalDestination = {
        x: random(cellSize / 2, maxPosition),
        y: random(cellSize / 2, maxPosition),
      };
      shape.destinationSet = false; // Reset destination flag
      shape.startTime = millis(); // Reset start time for next animation
    }
}
p5js: draw()-Methode
In der draw()-Methode wird über die globalen Animations-Variablen geprüft, ob die Animation aktiv ist oder nicht. Die geometrischen Formen werden für die angegebene animationDuration über die Methode animateExistingShapes(...) animiert und nach der Animation für die angegeben pauseDuration pausiert.
function draw() {
  // Get the current time in milliseconds
  let currentTime = millis();

  // If animation is active
  if (isAnimating) {
    // Animate existing shapes
    animateExistingShapes(circles, squares, arcs, triangles);

    // Check if animation duration has passed
    if (currentTime - lastActionTime > animationDuration) {
      // Update last action time
      lastActionTime = currentTime;
      // Stop animation and enter pause state
      isAnimating = false;
      isPaused = true;
    }
  } else {
    // Check if pause duration has passed
    if (currentTime - lastActionTime > pauseDuration) {
      // Update last action time
      lastActionTime = currentTime;
      // Resume animation
      isAnimating = true;
      isPaused = false;
    }
  }
}
Tastenbelegung
s-Taste: Speicherung des Canvas bei Pausierung = trued-Taste: Speicherung des Canvas bei Pausierung = falsePfeiltaste nach unten: Linienstärke = 1, keine FüllungPfeiltaste nach oben: Linienstärke = 10, keine FüllungPfeiltaste nach links: Füllung = 0 (schwarz)Pfeiltaste nach rechts: Füllung = 255 (weiß)
Mit der Tastenbelegung lassen sich neue Kompositionen mit den gleichen geometrischen Formen erschaffen und abspeichern.
function keyPressed() {
  // Check if the "s" key is pressed
  if (key === "s") {
    // Set saveImage flag to true to enable saving image
    saveImage = true;
    // Log message indicating the "s" key is pressed and saveImage status
    console.log("Image saving " + saveImage);
  } else if (key === "d") {
    // Check if the "d" key is pressed
    // Set saveImage flag to false to disable saving image
    saveImage = false;
    // Log message indicating the "d" key is pressed and saveImage status
    console.log("Image not saving " + saveImage);
  }

  // Check for arrow key presses
  if (keyCode === DOWN_ARROW) {
    // Set background color to white
    background(255);
    // Decrease stroke weight and set no fill
    strokeWeight(1);
    noFill();
    console.log("Stroke weight 1");
  } else if (keyCode === UP_ARROW) {
    // Set background color to white
    background(255);
    // Increase stroke weight and set no fill
    strokeWeight(10);
    noFill();
    console.log("Stroke weight 10");
  } else if (keyCode === LEFT_ARROW) {
    // Set background color to white
    background(255);
    // Set fill color to black
    fill(0);
    console.log("Fill 0");
  } else if (keyCode === RIGHT_ARROW) {
    // Set background color to white
    background(255);
    // Set fill color to white
    fill(255);
    console.log("Fill 255");
  }
}
Ausblick
Die resultierende generative Animation bietet eine stabiles Fundament um generative Kunst mit spannenden Kompositionen zu erschaffen. Potenzielle Animationen können die Größe und Rotation der geometrischen Formen betreffen.


Quellcode
Hier findest du den gesamten Quellcode.
Dieses Tutorial wurde von Viktor Schander und Natalie Schiechtele erstellt.


